If you’re anything like me, you’ve probably found yourself drowning in a sea of papers, pens, and random office supplies at least once (or, you know, every other day). But fear not! Today, we’re diving into some fantastic DIY home office storage solutions that will help you conquer the clutter and reclaim your workspace. And the best part? We’re doing it with recycled materials. 🌍💚
Why DIY Home Office Storage?
First things first, why go the DIY route? Well, not only is it budget-friendly, but it’s also a great way to add a personal touch to your office. Plus, using recycled materials means you’re doing your bit for the environment. It’s a win-win!
1. The Classic Shoe Box Organizer
Let’s start with something simple yet incredibly effective. Got some old shoe boxes lying around? Perfect! Here’s what you need to do:
Materials:
- Shoe boxes (various sizes)
- Wrapping paper or fabric
- Glue or double-sided tape
- Scissors
Steps:
- Prepare Your Boxes: Start by gathering your shoe boxes. They can be of various sizes, depending on what you need to store. Make sure they’re clean and sturdy.
- Decorate: Wrap each shoe box in your chosen paper or fabric. This is where you can really let your creativity shine. Go for vibrant patterns, elegant neutrals, or whatever suits your office aesthetic.
- Arrange: Stack the boxes in a way that suits your needs. You can create a mini shelf, place them side by side, or even make a pyramid.
- Secure: Glue or tape the boxes together to keep them stable. This will ensure they don’t topple over when you start filling them up.
Usage Tips:
- Use smaller boxes for pens, paper clips, and other small items.
- Larger boxes can hold documents, notebooks, and office supplies.
- Label each box to make finding things easier.
And voila! You’ve got yourself a stylish, custom storage unit for all those pesky papers and office knick-knacks.
2. Tin Can Desk Organizers
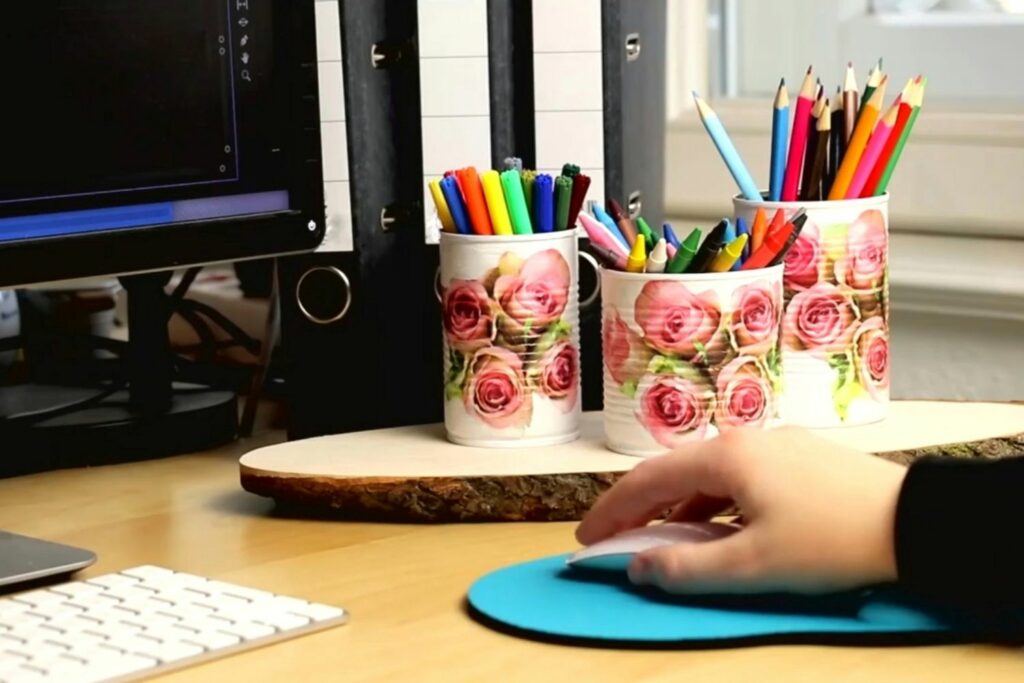
Next up, let’s talk tin cans. These little guys are often tossed in the recycling bin, but they can be incredibly handy for storage.
Materials:
- Empty tin cans (labels removed)
- Paint or washi tape
- Hot glue gun
Steps:
- Clean: Start by cleaning your tin cans thoroughly. Remove any labels and ensure there are no sharp edges.
- Decorate: Paint the cans or wrap them in washi tape for a pop of color. You can also use fabric or decorative paper.
- Assemble: Use a hot glue gun to attach the cans together in a cluster or line them up in a row. You can arrange them vertically or horizontally, depending on your space and needs.
Usage Tips:
- Perfect for holding pens, pencils, scissors, and other small items.
- Use taller cans for rulers and paintbrushes.
- Add labels to keep everything organized.
These are perfect for holding pens, pencils, scissors, and other small items. Plus, they add a cute touch to your desk!

3. Pallet Wood Shelving
For those of you who love a bit of woodworking, pallet wood is a fantastic resource. It’s sturdy, versatile, and, best of all, often free!
Materials:
- Pallet wood
- Sandpaper
- Screws and a drill
- Paint or stain (optional)
Steps:
- Prepare the Wood: Sand the pallet wood to smooth out any rough edges. This is important for both aesthetics and safety.
- Cut to Size: Cut the wood to your desired shelf size. Make sure to measure your space beforehand to ensure a good fit.
- Assemble: Attach the pieces together using screws and a drill. Make sure the shelves are sturdy and well-balanced.
- Finish: Paint or stain the wood if you want a polished look. This step is optional but can add a nice touch to your project.
Usage Tips:
- Use these shelves for books, binders, and office decor.
- Add hooks underneath for hanging items like keys or bags.
- Combine with other materials like metal brackets for added style.
Mount your new shelves on the wall, and you’ve got extra space for books, binders, and decor. Functional and fabulous!
4. Mason Jar Storage
Mason jars are another versatile and easily accessible item that can be repurposed into chic storage solutions.
Materials:
- Mason jars (various sizes)
- Paint (optional)
- Labels
Steps:
- Clean the Jars: Make sure your jars are clean and dry.
- Decorate: If you want to add a personal touch, you can paint the jars or add decorative labels.
- Arrange: You can place the jars on your desk, mount them on a piece of wood for a wall-mounted storage solution, or even use them as drawer organizers.
Usage Tips:
- Use smaller jars for paper clips, rubber bands, and thumbtacks.
- Medium jars are great for pens, markers, and other writing utensils.
- Larger jars can hold items like scissors, rulers, and other tools.
5. Corkboard Organizer
A corkboard isn’t just for pinning notes and photos. With a little creativity, it can become a versatile storage solution.
Materials:
- Corkboard
- Fabric (optional)
- Push pins
- Small containers or pouches
Steps:
- Prepare the Corkboard: If you want to add some flair, cover the corkboard with fabric.
- Attach Containers: Use push pins to attach small containers or pouches to the corkboard. You can also use clips to hold items.
- Organize: Use the containers for small office supplies, and pin important notes and reminders.
Usage Tips:
- Great for storing small items like erasers, paper clips, and sticky notes.
- Use it as a combination of storage and inspiration board.
- Keep frequently used items within easy reach.
6. Hanging File Organizer
If you’re short on desk space, a hanging file organizer can be a lifesaver.
Materials:
- Fabric or sturdy paper
- Sewing machine or glue
- Ribbon or hooks
Steps:
- Create Pockets: Cut the fabric or paper into pieces large enough to hold files and documents. Sew or glue the sides to create pockets.
- Attach Ribbon: Sew or glue ribbons to the tops of the pockets for hanging.
- Hang: Use hooks to hang the organizer on a wall or the back of a door.
Usage Tips:
- Use different colors or patterns for each pocket to easily identify categories.
- Label each pocket for quick access.
- Perfect for keeping important documents organized and off your desk.
A Few Final Tips
- Label Everything: Use labels to keep track of where everything goes. It saves time and keeps you organized.
- Maximize Wall Space: Don’t forget about vertical storage. Shelves, hooks, and pegboards can be lifesavers.
- Stay Consistent: Try to stick with a color scheme or theme to keep your office looking cohesive and tidy.
- Regularly Declutter: Make it a habit to go through your office supplies regularly. Get rid of what you don’t need and keep only what’s necessary.
- Personalize Your Space: Don’t forget to add personal touches like photos, plants, and artwork. A personalized workspace is a happy workspace.
That’s six super easy and eco-friendly DIY home office storage solutions that you can start on today. By using materials you already have or can easily find, you’ll not only save money but also create a workspace that’s uniquely yours. Remember, a tidy workspace leads to a tidy mind.


Leave a Comment